


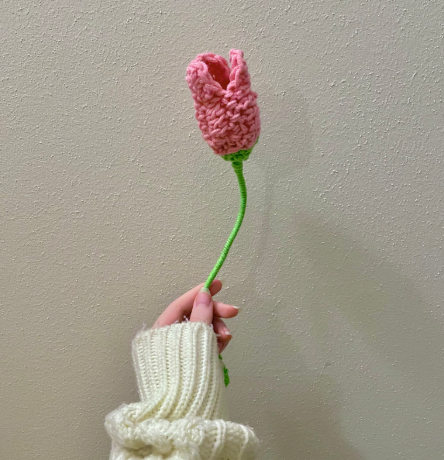
Spring has sprung! Although March’s weather has been predetermined for the worst by Phil the groundhog, Wisconsin is notorious for its unpredictability. As such, this month’s crochet pattern reflects my own hopes and dreams of spring coming as fast as possible. Though tulips typically bloom in April, they happen to be one of my favorite flowers, and by far the most spring-like. I think this flower is perfect to incite a new season of joy in 2026!
This pattern is much more of a craft, compared to something akin to a sewing or knitting pattern. The crochet itself is beginner/intermediate friendly, but it does require sewing and wire manipulation skills.
Materials:
- Medium weight yarn (2 colors*)
- Size J or 5-6mm crochet hook
- 1mm jewelry wire** (~1.5 ft)
- Wire cutters
- Jewelry pliers
* I recommend green for the stem and then a vibrant color of your choice.
** I would choose a relatively soft metal that you are able to bend easily.
Order of Steps:
- Crochet petals
- Sew petals together
- Crochet stem base
- Sew stem base to petals
- Add wire
- Wrap wire with yarn
Abbreviation Key:
- r = round
- st = stitch
- ch = chain
- sc = single crochet
- hdc = half double crochet
- dc = double crochet
- inc = increase
- sl st = slip stitch
Step 1: Petals (x3)
- slipknot, ch 9
r1- sc in ch 8 (previous ch you made), then hdc into the next 3 chains. dc the next 3 chains. In the last st, hdc 3 times into the same st, and then dc once in the st. Continuing around on to the other side, dc into the next 3 ch, hdc next 3, then sl st into last and cut and tie off ends.
You should have essentially crocheted in an oval around your original chain.
Step 2: Sew Petals Together
Starting just below the side of the petal, crochet two petals together a little over halfway up, so that there is an opening at the bottom and top. Then do the same for the third, attaching each side one at a time.
Step 3: Stem Base
r1- sc 4 into a magic circle, ch 1
r2- inc in every st from previous row
r3- sc whole row
r4 – alternate between sc and inc for the whole row, sl st, cut and tie off ends.
Step 5: Sew Base Onto Petals
Sew the edges of the base onto the petals, starting from where you attached the petals together around in a circle on the base of the petals. Be sure to attach to petals on the same side you sewed them together, as you will flip everything inside out when finished sewing.
Step 6: Add Wire
Cut a little over 1.5 feet of wire. Take around 5-6 inches of the wire and bend it at that point. Then, manipulate that length of wire into a circle that surrounds the point you bent it at, creating a platform. Then, take your now flipped wire bud and stick the end with no platform through its center and down into the center-most hole of your base. Once through, take your wire pliers and create a small loop.
Step 7: Stem
Tie your yarn of choice to the small loop created in the wire, and then wrap the yarn tightly up the entire length of your wire, making sure there are no gaps. Once you have reached the top, if you would like you can thread the yarn through the base to secure it, or wrap the yarn around a couple extra times for good measure. Then, wrap the length again down back to your original position. Secure your yarn end to a loop of yarn at the base or the original metal loop, and then tie off.
Consider making multiple of these flowers and create a bouquet!