


Snow, snow, snow! A polar vortex is expected to surround Wisconsin this holiday season, and it’s time to warm up and get crafting. We’ve always enjoyed mittens and their simplicity, but why do they have to be plain? For this month’s crochet pattern, we’re putting a little spin on the classic mitten.
When it comes to most store bought mittens, they are often just short enough to let the cold air and snow seep between the gaps of your perfectly bundled arms. Regrettably, they also aren’t very exciting to wear. Some children’s mittens feature fun colors and cute animals, but overall there’s not much room for customization if your hands are larger than a 10 year old’s. I hope that this mitten pattern provides both the security of a good length and the versatility of looking cute!
Before we start, I’d like to give credit to @brunaticality on Youtube, as I ended up referencing the base of her mitten quite a bit before working on this project. If you are a beginner, I would even recommend following her mitten tutorial as it has a lot of helpful tips and teaches you how to do some of the stitches present in this pattern. If you choose, you can follow her tutorial and then skip to step 5. However, your mitten may turn out differently from mine. Overall, the difficulty of this pattern is not high, but it does require sewing and crocheting “outside the lines.”
Materials:
- 200 grams of medium to bulky yarn* (around 2 skeins)
- 3.5mm or E crochet hook (chose smaller hook to limit gaps between stitches)
- Darning needle (optional)
- Stitch markers (optional)
* I would recommend wool or a wool blend for warmth. Polyester may work, but do not use cotton – it is cold when wet.
Order of Steps:
- Make thumb
- Make 2 conjoined mitts
- Make thumb
- Sew
- Make extension
- Make lace
You will be making two of the following pattern, there are instructions for how to fold the right and left hand at the bottom.
Abbreviation Key:
- r (round/row)
- st (stich)
- sl st (slip stitch)
- sc (single crochet)
- ch (chain)
- inc (increase stitch)
- dcs (decrease stitch)
- fd (foundation stitch)
- dc (double crochet)
- tc (treble/triple crochet)
Step 1: Making the thumb
Foundation:
- slipknot
- ch 36
-r1: sc into ch 35, sc into the rest of the chain until the last stitch, then inc into last st, ch1, turn
-r2: inc into first st, sc into the rest of the row, ch 1, turn
-r3: sc whole row, inc in last st, ch 1, turn
-r4: dcs in first st, sc whole row, ch 1, turn
-r5: sc whole row, dcs, ch 1
-r6: dcs, sc whole row, ch 1
Step 2: Making the mitt
-r7: sc 25, foundation stitch 16, ch 1
-r8: inc, sc whole row, ch 1
-r9: sc whole row, inc, ch 1
-r10: inc, sc whole row, ch 1
-r11: sc whole row, inc, ch 1,
-r12-19: sc whole row, ch 1
-r20: dcs, sc whole row, ch 1
-r21: sc whole row, dcs, ch 1
-r22: dcs, sc whole row, ch 1
-r23: sc whole row, dcs, ch 1
-r24-35: repeat the steps for r8-19
Step 3: Making the thumb (on other side)
-r36: dcs, sc 21, fd 10, ch 1
-r37: inc, sc rest of row, then dcs at the end of row, ch 1
-r38: dcs, sc whole row, inc in last st, ch 1,
-r39: dcs in first st, sc whole row, dcs in end of row, ch 1
-r40: dcs, sc whole row, dcs, ch 1
-r41: dcs, sc whole row, sl st into last stitch.
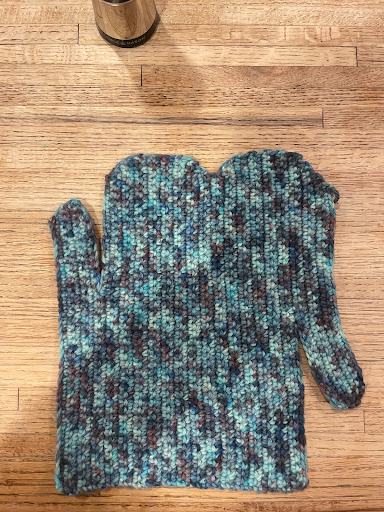
Step 4: Sew the two halves together
Use a darning needle or method of choice to sew the edges together, folding the thumbs together such that the thumb pointing down is flipped up and the thumb pointing up overlaps on top. If you plan to turn the mitten inside out after sewing, keep in mind that the hand will now be reversed (right hand will switch to left and vice versa).
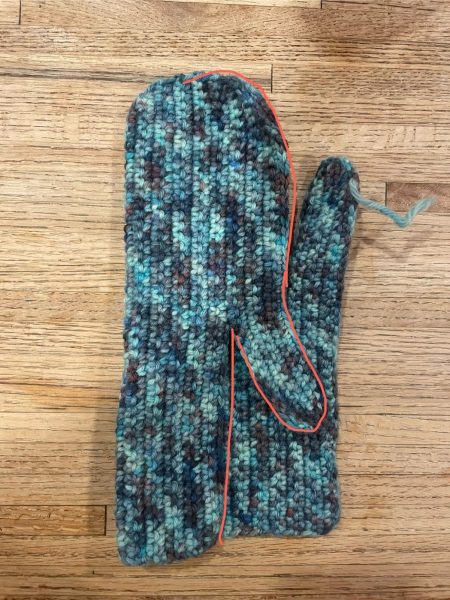
Diagram provided for reference:

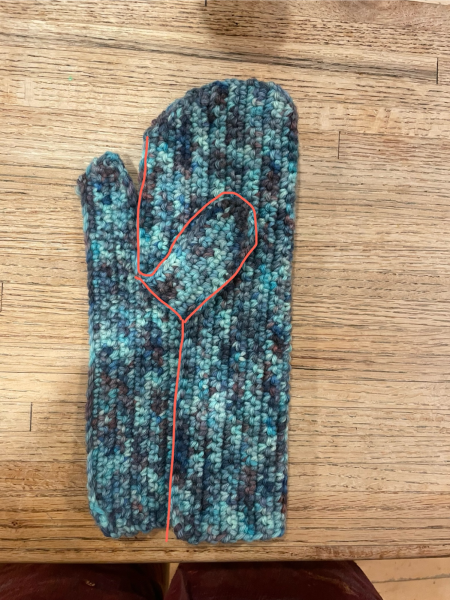
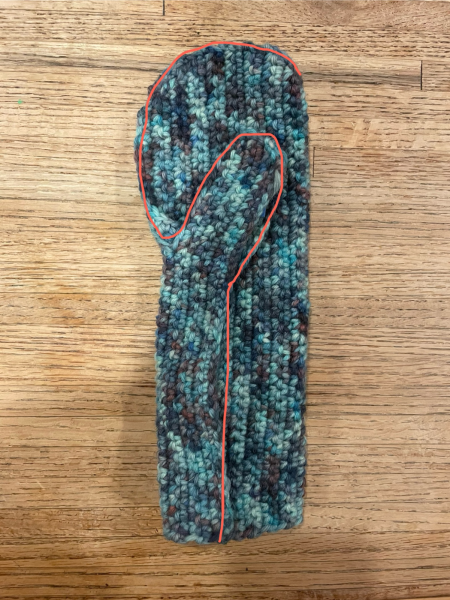
Left hand: flip to the side that has the thumb pointing up on the left. Then fold in half towards the thumb pointing up, and bend up the thumb pointing down. Fold the thumb on the left over the thumb you just bent. Now sew the two edges together along the seam. (The red line in the 4th picture)


Right hand: (same as left just mirrored) Flip your project so that the thumb pointing up is now on the right. Fold in half toward the thumb pointing up, and bend up the thumb pointing down. Then fold the thumb on the right over the thumb you just bent. Sew the edges together along the seam.
Step 5: Making the extension:
This is the part of the mitten that will fold over to create a cuff.
-r1: You will be crocheting around the circular bottom of the mitten where you would slip your hand into. Slip stitch into the edge where the seam of your mitten is*. Ch 1 and sc 32 stitches around the bottom of the mitten until you reach the first stitch. Make sure these stitches are close together and evenly spaced, as if there were normal stitches there.
-r2-18: ch 1 and sc whole row
-r19: inc once and then sc the next two stitches. Repeat this formula for the entire row
-r20: sc the whole row, and then slip stitch into the last st
Step 6: Crocheting the lace/scalloped edge
-r21: Keeping the loop of yarn on your hook, skip 3 stitches and double crochet x3 into that 4th stitch. Treble crochet once into the same stitch, and then add three more dc into it. Skip another 3 stitches, and sc into the 4th. Repeat x5. For the 6th and last scallop skip only one stitch, and create your scallop in the second. Then slip stitch into the first stitch of the row.
Cut and thread through your ends.
Repeat every step again to create the second mitten, making sure to fold the mitten the opposite way to create the second hand.
Congratulations! You now have a warm pair of mittens to enjoy the Holiday season.