


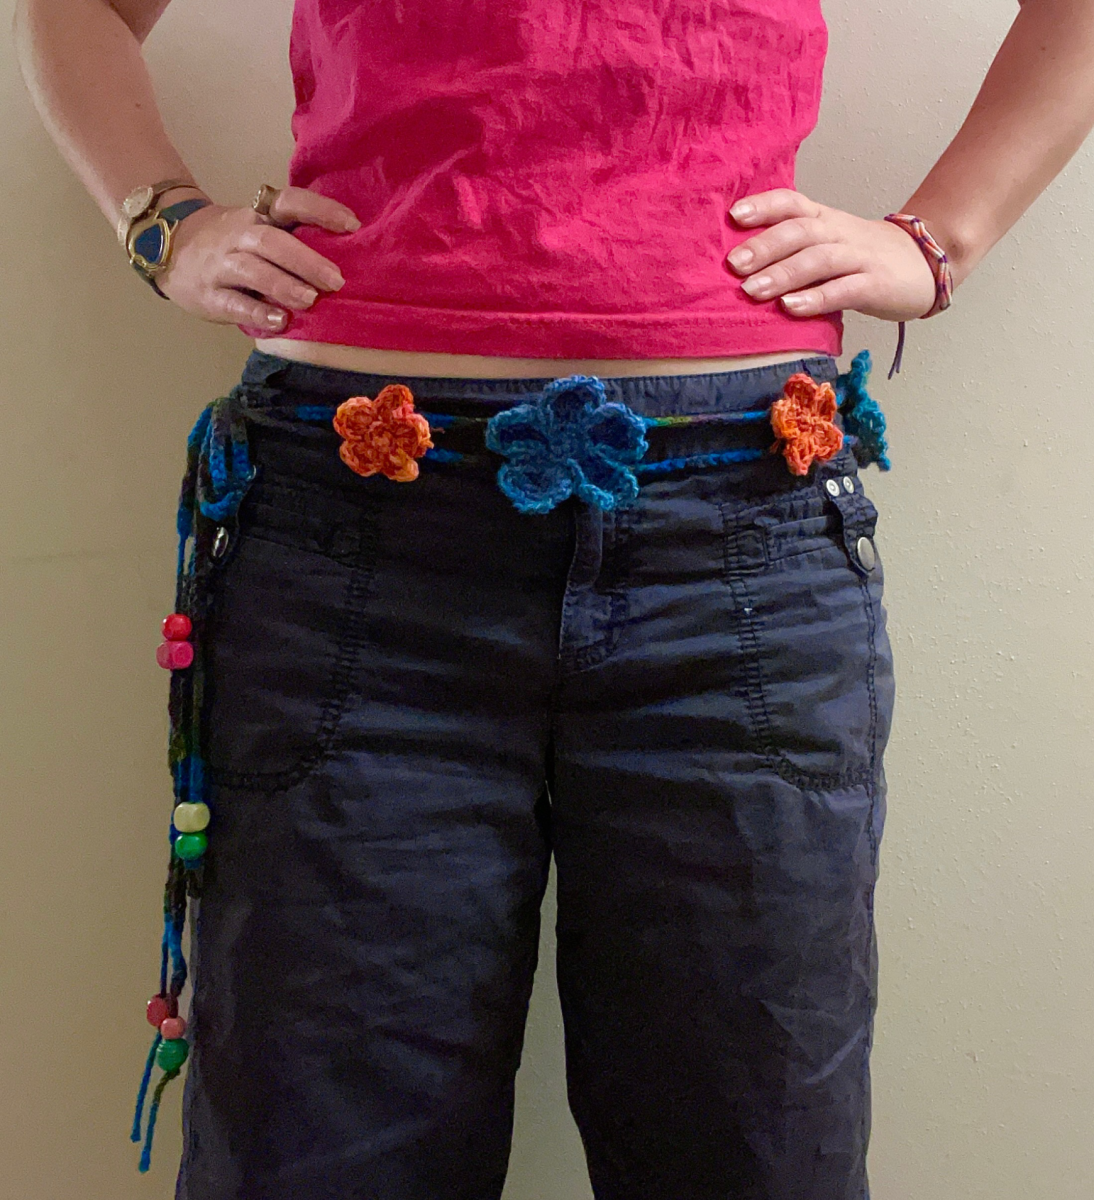


Happy June everyone! With the school year coming to an end, summer is finally just around the corner. And it’s probably with some shared relief, that we can all start looking ahead to the new season. For this month, I wanted the pattern to be fun, and not relatively time consuming. The result ended up being a sort of flower belt or sash that can be tied at the waist. I chose to add beads at the end of the tassels for added charm. Although drafting the pattern did take more time than I expected, the actual creation of this “belt” can be done within a day or two. (Probably 1-3 hours of crochet time for advanced/intermediate and 3-4 if beginner. Alot an extra hour for construction.)
Materials:
- Medium weight yarn (for strings and large flowers)
- Light weight yarn (for small flowers)
- 4.0 mm crochet hook
- Darning needle
- Beads (optional)
Abbreviations:
- St = stitch
- Ch = chain
- Dc = double crochet
- Trch = triple/treble crochet
- Sl st = slip stitch
Steps:
- Make belt strings
- Make flowers
- Attach flowers to belt strings
- Add beads
Belt Strings/Foundation: Make 2
Take your medium weight or preferred yarn of choice and create a slip knot. Make sure to leave a 4-5 inch tail before you start chaining. Then, chain your desired length. I chained about a yard, but you should be able to tie it around the area of your torso where you want the belt to sit (not super tight) and have an excess amount that hangs off after you have tied it. If you want to tie it in a bow, make sure you chain enough extra to still have excess hanging off after tying the bow.
These two strings will be the foundation of your belt, which you will sew the flowers on top of.
Small Flowers: Make 5-6 (or modify depending on your length)
Crochet 5 into a magic circle.
Row 1: Increase whole way around until you have 10 stitches.
Row 2: Starting from the next st from your hook, dc into the st. Then trch into the same st 4 times. Then dc into the same st one more time. Slip st into the next st. You have made one petal. Repeat all the steps until you have 5 petals wrapping all the way around your circle. Slip st one more time and tie off ends.
Large Flowers: Make 4-5 (or modify)
Crochet 5 into a magic circle.
Row 1: Increase around until you have 15 stitches.
Row 2: Starting from the next st from your hook, dc into the st. Then trch into the same st 4 times. Then dc into the same st one more time. Slip st into the next st. Then sl st one more time into the next st. Repeat until your have 5 petals.
Row 3: Ch 3. Going into the second stitch from your hook on the petal, sl st, then ch 4. Skip a st, then sl st and ch 4 into the next st. Skip another stitch and then repeat sl st and chain 4. Now that you have made 3 loops coming off the petal, ch 3 and crochet down into a hole made by the stitches from row 1, making a slip stitch. This creates an indent that defines the petals more. From this slip stitch you have just made, repeat all the steps of this row around each petal until you reach your starting point. Then sl st again and tie off ends.
Construction:
Try on strings again and mark where you tie the knot (I used stitch markers). Take it off and lay it flat so the strings are parallel and not twisted. Then take your flowers and place them where you want to sew them. (I alternated between big and small flowers with 1-2 inches between each one). Keep in mind that your strings will become less stretchy when you had finished adding the flowers. Then, using a darning needle (or crochet hook if you must) and sew the strings to the back of the flowers so that the top string is attached to the top of the flower’s back and the bottom string is attached to the bottom of the flower’s back. Do this for all the flowers and weave and tie off ends so that you cannot see them from the front.
Adding Beads:
If your beads have small enough holes to where you cannot comfortably pull the yarn through, grab a darning needle of the same size and use it to pull the yarn through.
Take the tail you left off earlier and thread that through your desired beads. Once you are done, tie a big enough knot on the end of your tail so that the beads will not fall off.